My Planner allows you to plan your courses for one semester or for future semesters by searching the course catalog or by using the academic requirements for your degree. To ensure that the courses added to your Planner will satisfy your degree requirements, it is suggested that you use the Plan by Requirements option.
Note: The My Planner option is not the same as actual enrollment in a class, it is only a planning tool.
To access My Planner in SIS, you must be logged into MyVWCC and inside the Student Information System.
Click on your Class Enrollment tile, and then click Planning to open the Planning menu.
Add Courses to My Planner
Using the Plan By My Requirements Option
- On the My Planner menu, click Plan By My Requirements. You may also use Browse Course Catalog (instructions below), but this is not the suggested method. Using Plan By My Requirements ensures the planned courses will satisfy your degree requirements.
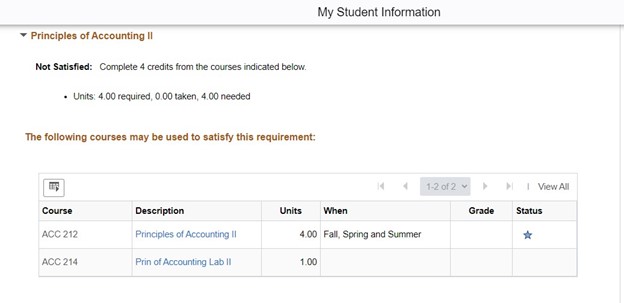
- The required courses for your degree program will be displayed on the page. Note: By default, satisfied requirements are collapsed and not satisfied requirements are expanded.
- To add a course to your planner, click on the Description link for the desired course under The following courses may be used to satisfy this requirement. Information about the course, such as the course description, will be displayed on the Course Detail page.
- Click Add to Planner, or View Class Sections. If you use View Class Sections:
- Click on the drop-down menu and select the Term, then click the Show Sections button. In some instances, the course you select may not be offered for the term selected. If the course is not offered for that term, the following message will be displayed: *** This course has not been scheduled. ***
- If you select a term and the Select button for class sections is not available, then the enrollment planning period has not yet started or has passed. For some terms, students may plan for their enrollment several days prior to the beginning of the open enrollment period.
- If the Select button is clicked, the class section is added to your Enrollment Shopping Cart where you can continue through the enrollment process (if enrollment is open) or click Next to continue adding courses to your planner.
- To continue planning by your requirements, click Return to Plan by My Requirements. You will see the courses you have selected. The status of these courses will be Planned (a blue star).

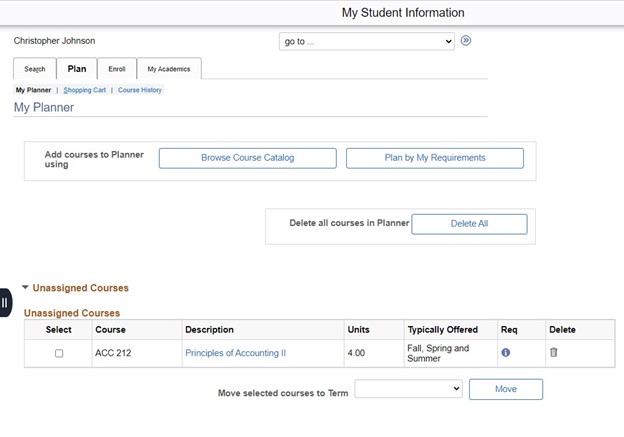
- To view courses in your planner, click My Planner at the top of the page. Any class sections that were added to your enrollment shopping cart will not appear in your Planner but will appear on your Plan By My Requirements Report. The i icon indicates that the course will satisfy a requirement for your degree plan.

Using the Browse Course Catalog Option
Caution: When using this option, all courses are returned, not just those required for your degree program.
- On the Planning menu, click the Browse Course Catalog button.
- On the Browse Course Catalog page, select the letter of the alphabet that corresponds to the subject code of the course you are searching for.
- Scroll through the list of subjects until you find the one you need, then click on the subject code to display the courses.
- From the displayed list of courses, click the box in the Select column to add the course to your planner, then click Add to Planner.
- Note the message that indicates the course has been added to your planner. To view your planner, click My Planner at the top of the page.
Moving and Deleting Courses in the Planner
After adding courses to your planner, you can also delete these courses, organize them into specific terms, or move them from your planner to the enrollment shopping cart (if enrollment is open).
To delete a course, use the trash can icon. To delete all courses, use the Delete All button.
To move a course, check the box in the Select column next to the class you wish to move, use the Move selected courses to Term drop-down to select a term, and click move. You will receive a confirmation message.
Move a Course to your Enrollment Shopping Cart
- Make sure the course has been moved to the correct term in your Planner.
- Click the Shopping Cart tab at the top of the page.
- If necessary, select the desired term and click Continue.
- Select Planner and click Search.
- Click Select next to the appropriate class. A listing of available class sections will be displayed. Click Select next to the desired class section. The class will be added to your enrollment shopping cart where you may continue through the enrollment process.
Hours
Mon – Fri: 7:45 AM – 5:00 PM
Contact Us
Business Science M273
540-857-7354
helpdesk@virginiawestern.edu (Students)
Submit a Ticket (Faculty & Staff)
VWCC Alerts
We use the VW Mass Notification System to immediately contact you during a major crisis or emergency. Get more info and register!


